08
6

EF Add-Migration总结

0
归档:2024年6月分类:C#和.NET

EF CodeFirst对数据库任何的操作,千万不要手工去修改。

解释:add-migration命令是code first migration中的关键命令之一。当您对领域域模型进行更改并需要将它们时添加到数据库中,您将创建一个新的迁移。这是通过Add-Migration命令完成的。用最简单的形式,你只需要提供迁移名称

展现形式:命令将您的更改构建到一个cs文件中。这个cs文件与配置文件放在同一个文件夹中,服务于您要瞄准的DbContext

1.常用的命令:

Add-Migration 、 Update-DataBase 、 Script-Migration

(1)vs的程序包管理控制台输入 get-help Add-Migration -detailed以查看详细信息

Add-Migration
[-Name] :指定自定义脚本 的名字
[-Force] [-ProjectName ] :如果要重新构建现有迁移,必须使用-Force参数。然而,只有在迁移尚未应用到数据库时,才能重新构建框架。否则你 需要回复到要重新构建的迁移之前的迁移
[-StartUpProjectName ] :是从 解决方案资源管理器中选择一个项目 作为启动项目。如果我们忽略的话,就会默认为解决方案资源管理器中的启动项目。
[-ConfigurationTypeName ] :项目中有多个DbContext,那么您需要指出哪个数据库会更新。这可以用-ConfigurationTypeName做。ConfigurationTypeName方法是迁移文件夹中配置类的名称。
[-ConnectionStringName ] :从应用程序的配置文件中指定要使用的连接字符串的名字。我们用两个参数-ConnectionString -ConnectionProviderName ,或者用这样一个参数代替
[-IgnoreChanges] :假设目标数据库模式与当前的模型是一致的。构建一个空迁移和对应的空的迁移文件,忽略在当前模型中检测到的任何挂起的更改。可用于创建初始的空迁移,以支持对现有数据库的迁移。
[-AppDomainBaseDirectory ]:指定用于运行数据迁移代码的app-domain的路径,从而app-domain 可以找到所有需要的程序集。这是一个高级选项,只有当解决方案包含多个项目时才会需要。这样的话,context和configuration所需要的程序集就不仅仅从那些包含context和包含migrations的项目中获取
CommonParameters

Add-Migration (你的迁移文件名称)

若在一个项目里,操作多个DbConext的方法则需要指定context名称

add-migration 迁移名称 -c ConfigurationDbContext

update-database -c ConfigurationDbContext

05
6

MediatR Official Document

0
归档:2024年6月分类:C#和.NET

MediatR is a low-ambition library trying to solve a simple problem — decoupling the in-process sending of messages from handling messages. Cross-platform, supporting netstandard2.0.

Setup

Install the package via NuGet first:
Install-Package MediatR

MediatR directly references Microsoft.Extensions.DependencyInjection.Abstractions leveraging IServiceProvider. Typical usage is to use IServiceCollection directly:

services.AddMediatR(cfg => {
    cfg.RegisterServicesFromAssembly(typeof(Program).Assembly);
});


This method registers the known MediatR types:

  • IMediator as transient
  • ISender as transient
  • IPublisher as transient

For each assembly registered, the AddMediatR method will scan those assemblies for MediatR types (excluding behaviors):

  • IRequestHandler<,> concrete implementations as transient
  • IRequestHandler<> concrete implementations as transient
  • INotificationHandler<> concrete implementations as transient
  • IStreamRequestHandler<> concrete implementations as transient
  • IRequestExceptionHandler<,,> concrete implementations as transient
  • IRequestExceptionAction<,>) concrete implementations as transient

Behaviors and pre/post processors must be registered explicitly through the AddXyz methods.

Basics

MediatR has two kinds of messages it dispatches:

  • Request/response messages, dispatched to a single handler
  • Notification messages, dispatched to multiple handlers

Request/response

The request/response interface handles both command and query scenarios. First, create a message:

public class Ping : IRequest<string> { }


Next, create a handler:

public class PingHandler : IRequestHandler<Ping, string>
{
    public Task<string> Handle(Ping request, CancellationToken cancellationToken)
    {
        return Task.FromResult("Pong");
    }
}


Finally, send a message through the mediator:

var response = await mediator.Send(new Ping());
Debug.WriteLine(response); // "Pong"


In the case your message does not require a response, implement the non-generic IRequest interface and subsequent handler:

public class OneWay : IRequest { }
public class OneWayHandler : IRequestHandler<OneWay>
{
    public Task Handle(OneWay request, CancellationToken cancellationToken)
    {
        // do work
        return Task.CompletedTask;
    }
}


Request types

There are two flavors of requests in MediatR - ones that return a value, and ones that do not:

  • IRequest<TResponse> - the request returns a value
  • IRequest - the request does not return a value

Each request type has its own handler interface:

  • IRequestHandler<TRequest, TResponse> - implement this and return Task<TResponse>

Then for requests without return values:

  • IRequestHandler<TRequest> - implement this and you will return Task.

Streams and AsyncEnumerables

To create a stream from a request, first implement the stream request and its response:

  • IStreamRequest<TResponse>

    public sealed class CounterStreamRequest : IStreamRequest<int> { }


Stream request handlers are separate from the normal IRequestHandler and require implementing:

  • IStreamRequestHandler<TRequest, TResponse>

    public sealed class CounterStreamHandler : IStreamRequestHandler<CounterStreamRequest, int>
    {
        public async IAsyncEnumerable<int> Handle(CounterStreamRequest request, [EnumeratorCancellation] CancellationToken cancellationToken)
        {
            int count = 0;
            while (!cancellationToken.IsCancellationRequested)
            {
                await Task.Delay(500, cancellationToken);
                yield return count;
                count++;
            }
        }
    }


Unlike normal request handlers that return a single TResponse, a stream handler returns an IAsyncEnumerable<TResponse>:

IAsyncEnumerable<TResponse> Handle(TRequest request, CancellationToken cancellationToken);


To create a stream request handler, create a class that implements IStreamRequestHandler<TRequest, TResponse> and implement the above Handle method.

Finally, send a stream message through the mediator:

    CancellationTokenSource cts = new();
    int count = 10;
    await foreach (var item in mediator.CreateStream<int>(new CounterStreamRequest(), cts.Token))
    {
        count--;
        if (count == 0)
        {
            cts.Cancel();
        }
        Debug.WriteLine(item);
    }


Notifications

For notifications, first create your notification message:

public class Ping : INotification { }


Next, create zero or more handlers for your notification:

public class Pong1 : INotificationHandler<Ping>
{
    public Task Handle(Ping notification, CancellationToken cancellationToken)
    {
        Debug.WriteLine("Pong 1");
        return Task.CompletedTask;
    }
}

public class Pong2 : INotificationHandler<Ping>
{
    public Task Handle(Ping notification, CancellationToken cancellationToken)
    {
        Debug.WriteLine("Pong 2");
        return Task.CompletedTask;
    }
}


Finally, publish your message via the mediator:

await mediator.Publish(new Ping());


Custom notification publishers

MediatR (starting with version 12) supports custom publish strategies:

public interface INotificationPublisher
{
    Task Publish(IEnumerable<NotificationHandlerExecutor> handlerExecutors, INotification notification,
        CancellationToken cancellationToken);
}


Custom publish strategies are injected into the Mediator class, and are registered with AddMediatR:

services.AddMediatR(cfg => {
    cfg.RegisterServicesFromAssemblyContaining<Program>();
    cfg.NotificationPublisher = new MyCustomPublisher(); // this will be singleton
    cfg.NotificationPublisherType = typeof(MyCustomPublisher); // this will be the ServiceLifetime
});


There are two built-in notification publishers:

  • ForeachAwaitPublisher - the default, existing implementation
  • TaskWhenAllPublisher - awaits Task.WhenAll for all notification handler tasks. Does NOT use Task.Run

Custom notification publishers can also use the handler instance to do custom logic like ordering, skipping handlers, etc. The handler instance is on the NotificationHandlerExecutor class, as well as the delegate to call the handler instance itself.

Polymorphic dispatch

Handler interfaces are contravariant:

public interface IRequestHandler<in TRequest, TResponse> where TRequest : IRequest<TResponse>
{
    Task<TResponse> Handle(TRequest message, CancellationToken cancellationToken);
}

public interface INotificationHandler<in TNotification>
{
    Task Handle(TNotification notification, CancellationToken cancellationToken);
}


Containers that support generic variance will dispatch accordingly. For example, you can have an INotificationHandler<INotification> to handle all notifications.

Async

Send/publish are asynchronous from the IMediator side, with corresponding synchronous and asynchronous-based interfaces/base classes for requests/responses/notification handlers.

Your handlers can use the async/await keywords as long as the work is awaitable:

public class PingHandler : IRequestHandler<Ping, Pong>
{
    public async Task<Pong> Handle(Ping request, CancellationToken cancellationToken)
    {
        await DoPong(); // Whatever DoPong does
    }
}


You will also need to register these handlers with the IoC container of your choice, similar to the synchronous handlers shown above.

Exceptions handling

Exception handler pipeline step

Exception handler implemented by using IPipelineBehavior concept. It requires to add the RequestExceptionProcessorBehavior to the request execution Pipeline. This behavior is not registered unless AddMediatR finds request exception behaviors.

namespace MediatR.Pipeline;

/// <summary>
/// Behavior for executing all <see cref="IRequestExceptionHandler{TRequest,TResponse,TException}"/> instances
///     after an exception is thrown by the following pipeline steps
/// </summary>
/// <typeparam name="TRequest">Request type</typeparam>
/// <typeparam name="TResponse">Response type</typeparam>
public class RequestExceptionProcessorBehavior<TRequest, TResponse, TException> : IRequestExceptionHandler<TRequest, TResponse, TException>
    where TRequest : notnull
{


Exception action pipeline step

Exception action implemented by using IPipelineBehavior concept. It requires to add the RequestExceptionActionProcessorBehavior to the request execution Pipeline.
If place RequestExceptionActionProcessorBehavior before RequestExceptionProcessorBehavior, actions will be called only for unhandled exceptions.

namespace MediatR.Pipeline;

/// <summary>
/// Behavior for executing all <see cref="IRequestExceptionAction{TRequest,TException}"/> instances
///     after an exception is thrown by the following pipeline steps
/// </summary>
/// <typeparam name="TRequest">Request type</typeparam>
/// <typeparam name="TResponse">Response type</typeparam>
public class RequestExceptionActionProcessorBehavior<TRequest, TResponse> : IRequestExceptionAction<TRequest, TException>
    where TRequest : notnull
{


Handlers and actions priority execution

All available handlers/actions will be sorted by applying next rules:

  • The handler/action has a higher priority if it belongs to the current assembly (same assembly with request) and the other is not. If none of the objects belong to the current assembly, they can be considered equal. If both objects belong to the current assembly, they can't be compared only by this criterion - compare by next rule;
  • The handler/action has a higher priority if it belongs to the current/child request namespace and the other is not. If both objects belong to the current/child request namespace, they can be considered equal. If none of the objects belong to the current/child request namespace, they can't be compared by this criterion - compare by next rule;
  • The handler/action has a higher priority if it namespace is part of the current location (request namespace) and the other is not. If both objects are part of the current location, the closest has higher priority. If none of the objects are part of the current location, they can be considered equal.

Override handler/action

Create a new handler / action that inherits the handler / action that you want to override, and save it in accordance with the priority rules.

Exception handler vs Exception action

  • All actions will be performed for the thrown exception. However, only one handler can handle the thrown exception;
  • The exception will be re-thrown after all actions are completed. But the exception can be handled by the exception handler, and the result will be returned to the caller;
  • The actions execution process faster. Because the exception handler works like try / catch block with several catch and search handlers for all base exceptions separately;
  • Both support priority sorting;
  • Both support overriding.

05
6

[转]MediatR知多少

0
归档:2024年6月分类:C#和.NET

原文:https://www.cnblogs.com/sheng-jie/p/10280336.html

引言
首先不用查字典了,词典查无此词。猜测是作者笔误将Mediator写成MediatR了。废话少说,转入正题。

先来简单了解下这个开源项目MediatR(作者Jimmy Bogard,也是开源项目AutoMapper的创建者,在此表示膜拜):

Simple mediator implementation in .NET. In-process messaging with no dependencies. Supports request/response, commands, queries, notifications and events, synchronous and async with intelligent dispatching via C# generic variance.
.NET中的简单中介者模式实现,一种进程内消息传递机制(无其他外部依赖)。 支持以同步或异步的形式进行请求/响应,命令,查询,通知和事件的消息传递,并通过C#泛型支持消息的智能调度。

如上所述,其核心是一个中介者模式的.NET实现,其目的是消息发送和消息处理的解耦。它支持以单播和多播形式使用同步或异步的模式来发布消息,创建和侦听事件。

中介者模式既然是对中介者模式的一种实现,那么我们就有必要简要介绍下中介者这个设计模式,以便后续展开。
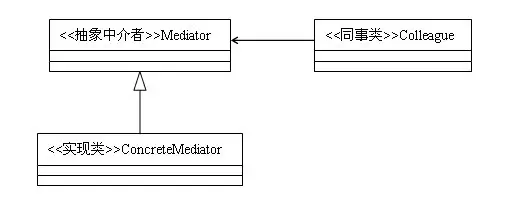
file
中介者模式类图
中介者模式:用一个中介对象封装一系列的对象交互,中介者使各对象不需要显示地相互作用,从而使耦合松散,而且可以独立地改变它们之间的交互。

看上面的官方定义可能还是有点绕,那么下面这张图应该能帮助你对中介者模式有个直观了解。
file
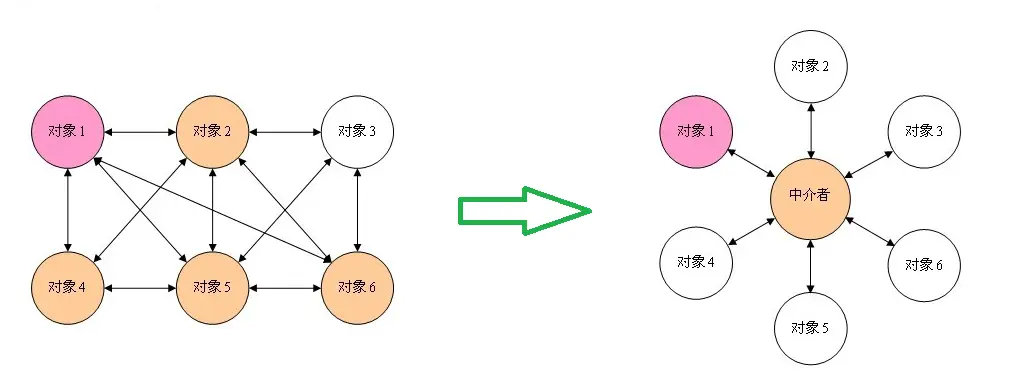
使用中介模式,对象之间的交互将封装在中介对象中。对象不再直接相互交互(解耦),而是通过中介进行交互。这减少了对象之间的依赖性,从而减少了耦合。

那其优缺点也在图中很容易看出:

优点:中介者模式的优点就是减少类间的依赖,把原有的一对多的依赖变成了一对一的依赖,同事类只依赖中介者,减少了依赖,当然同时也降低了类间的耦合
缺点:中介者模式的缺点就是中介者会膨胀得很大,而且逻辑复杂,原本N个对象直接的相互依赖关系转换为中介者和同事类的依赖关系,同事类越多,中介者的逻辑就越复杂。

Hello MeidatR
在开始之前,我们先来了解下其基本用法。

单播消息传输
单播消息传输,也就是一对一的消息传递,一个消息对应一个消息处理。其通过IRequest来抽象单播消息,用IRequestHandler进行消息处理。

//构建 消息请求
public class Ping : IRequest { }
//构建 消息处理
public class PingHandler : IRequestHandler<Ping, string> {
public Task Handle(Ping request, CancellationToken cancellationToken) {
return Task.FromResult("Pong");
}
}
//发送 请求
var response = await mediator.Send(new Ping());
Debug.WriteLine(response); // "Pong"

多播消息传输
多播消息传输,也就是一对多的消息传递,一个消息对应多个消息处理。其通过INotification来抽象多播消息,对应的消息处理类型为INotificationHandler。

//构建 通知消息
public class Ping : INotification { }
//构建 消息处理器1
public class Pong1 : INotificationHandler {
public Task Handle(Ping notification, CancellationToken cancellationToken) {
Debug.WriteLine("Pong 1");
return Task.CompletedTask;
}
}
//构建 消息处理器2
public class Pong2 : INotificationHandler {
public Task Handle(Ping notification, CancellationToken cancellationToken) {
Debug.WriteLine("Pong 2");
return Task.CompletedTask;
}
}

//发布消息
await mediator.Publish(new Ping());
源码解析
对MediatR有了基本认识后,我们来看看源码,研究下其如何实现的。
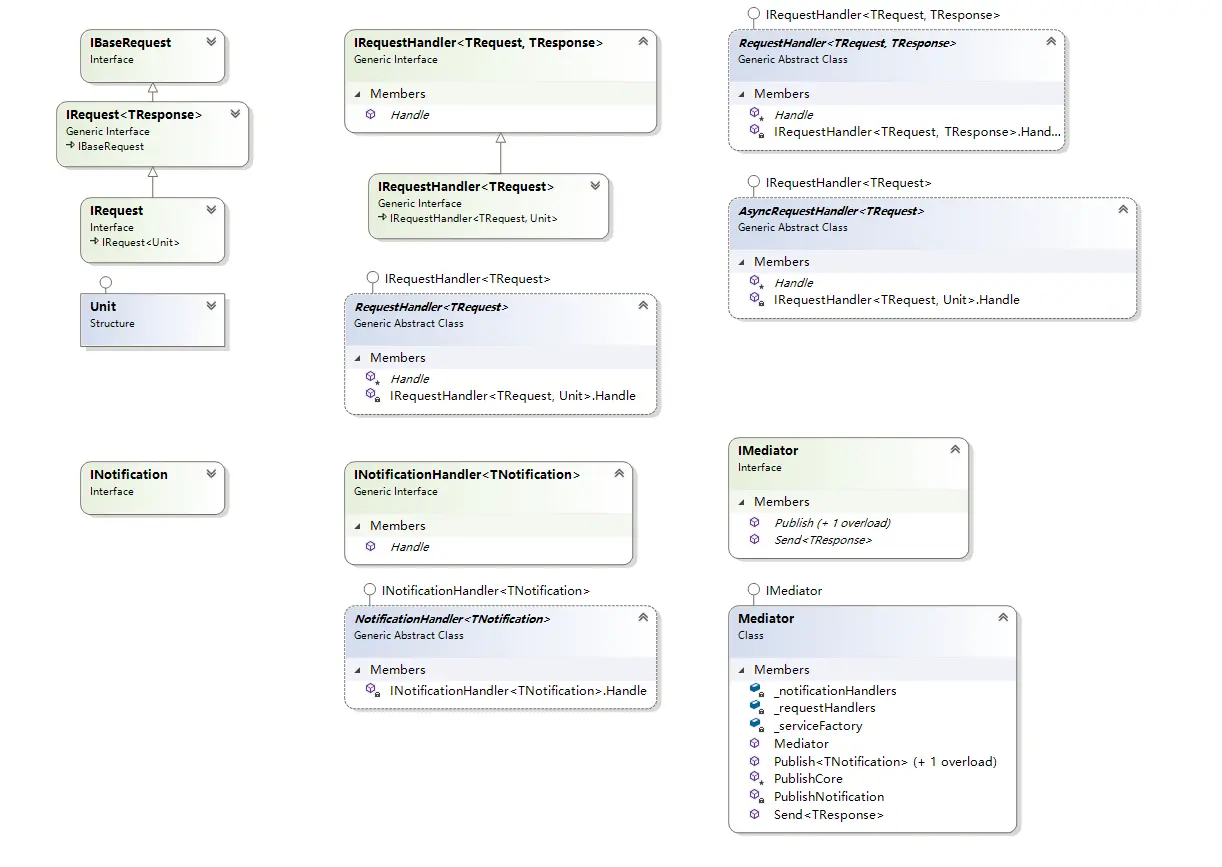
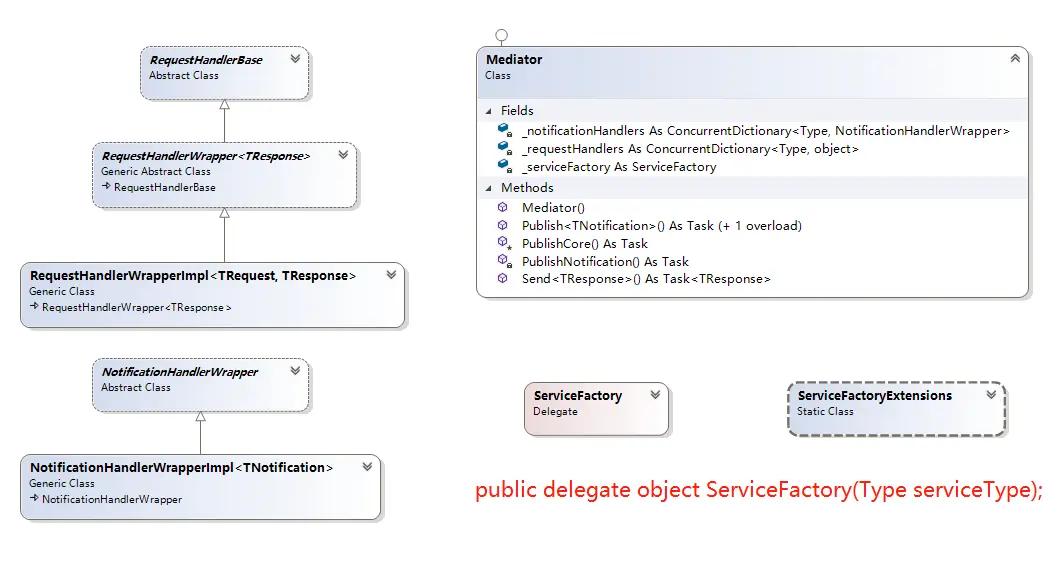
file
类图
从代码图中我们可以看到其核心的对象主要包括:

IRequest Vs IRequestHandler
INotification Vs INoticifaitonHandler
IMediator Vs Mediator
Unit
IPipelineBehavior
IRequest Vs IRequestHandler
其中IRequest和INotification分别对应单播和多播消息的抽象。
对于单播消息可以决定是否需要返回值选用不同的接口:

IRequest - 有返回值
IRequest - 无返回值
这里就不得不提到其中巧妙的设计,通过引入结构类型Unit来代表无返回的情况。

///

/// 代表无需返回值的请求
///

public interface IRequest : IRequest { }

///

/// 代表有返回值的请求
///

/// Response type
public interface IRequest : IBaseRequest { }

///

/// Allows for generic type constraints of objects implementing IRequest or IRequest{TResponse}
///

public interface IBaseRequest { }
同样对于IRequestHandler也是通过结构类型Unit来处理不需要返回值的情况。

public interface IRequestHandler<in TRequest, TResponse>
where TRequest : IRequest
{
Task Handle(TRequest request, CancellationToken cancellationToken);
}

public interface IRequestHandler : IRequestHandler<TRequest, Unit>
where TRequest : IRequest
{
}
从上面我们可以看出定义了一个方法名为Handle返回值为Task的包装类型,而因此赋予了其具有以同步和异步的方式进行消息处理的能力。我们再看一下其以异步方式进行消息处理(无返回值)的默认实现AsyncRequestHandler:

public abstract class AsyncRequestHandler : IRequestHandler
where TRequest : IRequest
{
async Task IRequestHandler<TRequest, Unit>.Handle(TRequest request, CancellationToken cancellationToken)
{
await Handle(request, cancellationToken).ConfigureAwait(false);
return Unit.Value;
}

protected abstract Task Handle(TRequest request, CancellationToken cancellationToken);

}
从上面的代码来看,我们很容易看出这是装饰模式的实现方式,是不是很巧妙的解决了无需返回值的场景。

最后我们来看下结构类型Unit的定义:

public struct Unit : IEquatable, IComparable, IComparable
{
public static readonly Unit Value = new Unit();

public static readonly Task Task = System.Threading.Tasks.Task.FromResult(Value);
// some other code

}
IMediator Vs MediatorMediatR 类图

file

IMediator主要定义了两个方法Send和Publish,分别用于发送消息和发布通知。其默认实现Mediator中定义了两个集合,分别用来保存请求与请求处理的映射关系。

//Mediator.cs
//保存request和requesthandler的映射关系,1对1。
private static readonly ConcurrentDictionary<Type, object> _requestHandlers = new ConcurrentDictionary<Type, object>();
//保存notification与notificationhandler的映射关系,
private static readonly ConcurrentDictionary<Type, NotificationHandlerWrapper> _notificationHandlers = new ConcurrentDictionary<Type, NotificationHandlerWrapper>();
这里面其又引入了两个包装类:RequestHandlerWrapper和NotificationHandlerWrapper。这两个包装类的作用就是用来传递ServiceFactory委托进行依赖解析。

所以说Mediator借助public delegate object ServiceFactory(Type serviceType);完成对Ioc容器的一层抽象。这样就可以对接任意你喜欢用的Ioc容器,比如:Autofac、Windsor或ASP.NET Core默认的Ioc容器,只需要在注册IMediator时指定ServiceFactory类型的委托即可,比如ASP.NET Core中的做法:
ASP.NET Core注册IMediatr
在使用ASP.NET Core提供的原生Ioc容器有些问题:Service registration crashes when registering generic handlers

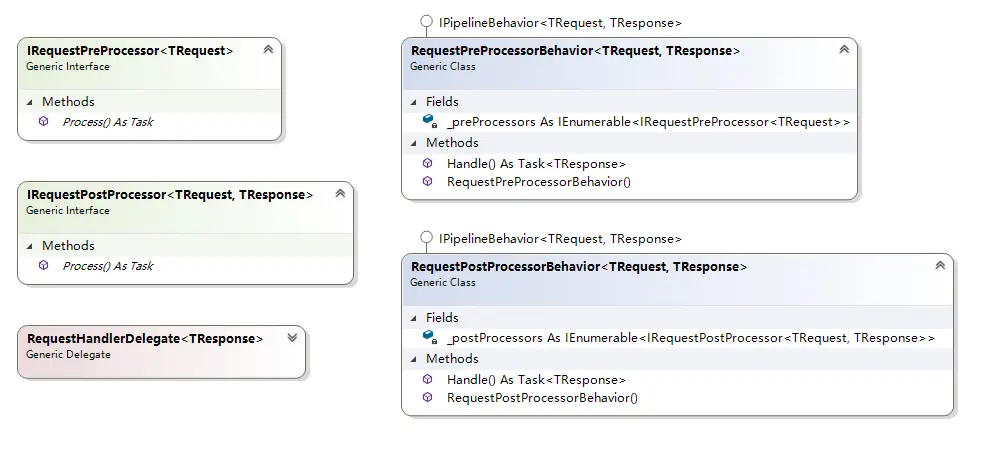
IPipelineBehavior处理管道
MeidatR支持按需配置请求管道进行消息处理。即支持在请求处理前和请求处理后添加额外行为。仅需实现以下两个接口,并注册到Ioc容器即可。
file
IRequestPreProcessor 请求处理前接口
IRequestPostProcessor<in TRequest, in TResponse> 请求处理后接口
其中IPipelineBehavior的默认实现:RequestPreProcessorBehavior和RequestPostProcessorBehavior分别用来处理所有实现IRequestPreProcessor和IRequestPostProcessor接口定义的管道行为。

而处理管道是如何构建的呢?我们来看下RequestHandlerWrapperImpl的具体实现:

internal class RequestHandlerWrapperImpl<TRequest, TResponse> : RequestHandlerWrapper
where TRequest : IRequest
{
public override Task Handle(IRequest request, CancellationToken cancellationToken,
ServiceFactory serviceFactory)
{
Task Handler() => GetHandler<IRequestHandler<TRequest, TResponse>>(serviceFactory).Handle((TRequest) request, cancellationToken);

    return serviceFactory
        .GetInstances>()
        .Reverse()
        .Aggregate((RequestHandlerDelegate) Handler, (next, pipeline) => () => pipeline.Handle((TRequest)request, cancellationToken, next))();
}

}
就这样一个简单的函数,涉及的知识点还真不少,说实话我花了不少时间来理清这个逻辑。
那都涉及到哪些知识点呢?我们一个一个的来理一理。

C# 7.0的新特性 - 局部函数
C# 6.0的新特性 - 表达式形式的成员函数
Linq高阶函数 - Aggregate
匿名委托
构造委托函数链
关于第1、2个知识点,请看下面这段代码:

public delegate int SumDelegate();//定义委托
public static void Main()
{
//局部函数(在函数内部定义函数)
//表达式形式的成员函数, 相当于 int Sum() { return 1 + 2;}
int Sum() => 1 + 2;

var sumDelegate = (SumDelegate)Sum;//转换为委托
Console.WriteLine(sumDelegate());//委托调用,输出:3

}
再看第4个知识点,匿名委托:

public delegate int SumDelegate();

SumDelegate delegater1 = delegate(){ return 1+2; }
//也相当于
SumDelegate delegater2 => 1+2;
下面再来介绍一下Aggregate这个Linq高阶函数。Aggregate是对一个集合序列进行累加操作,通过指定初始值,累加函数,以及结果处理函数完成计算。

函数定义:

public static TResult Aggregate<TSource,TAccumulate,TResult>
(this IEnumerable source,
TAccumulate seed,
Func<TAccumulate,TSource,TAccumulate> func,
Func<TAccumulate,TResult> resultSelector);
根据函数定义我们来写个简单的demo:

var nums = Enumerable.Range(2, 3);//[2,3,4]
// 计算1到5的累加之和,再将结果乘以2
var sum = nums.Aggregate(1, (total, next) => total + next, result => result 2);// 相当于 (((1+2)+3)+4)2=20
Console.WriteLine(sum);//20
和函数参数进行一一对应:

seed : 1
Func<TAccumulate,TSource,TAccumulate> func : (total, next) => total + next
Func<TAccumulate,TResult> resultSelector : result => result * 2
基于上面的认识,我们再来回过头梳理一下RequestHandlerWrapperImpl。
其主要是借助委托:public delegate Task RequestHandlerDelegate();来构造委托函数链来构建处理管道。

对Aggregate函数了解后,我们就不难理解处理管道的构建了。请看下图中的代码解读:
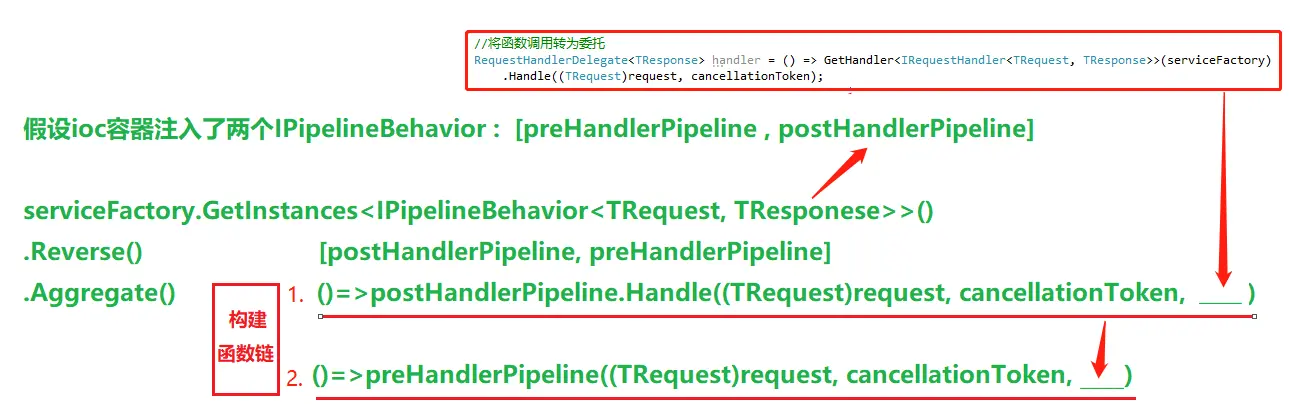
file
file

请求处理管道代码解读 构建流程解析
那如何保证先执行IRequestPreProcessor再执行IRequestPostProcessor呢?
就是在注册到Ioc容器时必须保证顺序,先注册IRequestPreProcessor再注册IRequestPostProcessor。(这一点很重要!!!)

看到这里有没有想到ASP.NET Core中请求管道中中间件的构建呢?是不是很像俄罗斯套娃?先由内而外构建管道,再由外而内执行!

至此,MediatR的实现思路算是理清了。

应用场景
如文章开头提到:MediatR是一种进程内消息传递机制。 支持以同步或异步的形式进行请求/响应,命令,查询,通知和事件的消息传递,并通过C#泛型支持消息的智能调度。

那么我们就应该明白,其核心是消息的解耦。因为我们几乎都是在与消息打交道,那因此它的应用场景就很广泛,比如我们可以基于MediatR实现CQRS、EventBus等。

另外,还有一种应用场景:我们知道借助依赖注入的好处是,就是解除依赖,但我们又不得不思考一个问题,随着业务逻辑复杂度的增加,构造函数可能要注入更多的服务,当注入的依赖太多时,其会导致构造函数膨胀。比如:

public DashboardController(
ICustomerRepository customerRepository,
IOrderService orderService,
ICustomerHistoryRepository historyRepository,
IOrderRepository orderRepository,
IProductRespoitory productRespoitory,
IRelatedProductsRepository relatedProductsRepository,
ISupportService supportService,
ILog logger
)
如果借助MediatR进行改造,也许仅需注入IMediatR就可以了。

public DashboardController(IMediatR mediatr)
总结
看到这里,也许你应该明白MediatR实质上并不是严格意义上的中介者模式实现,我更倾向于其是基于Ioc容器的一层抽象,根据请求定位相应的请求处理器进行消息处理,也就是服务定位。

04
6

关于MSBuild和NSwag的深入学习

0
归档:2024年6月分类:C#和.NET

这段时间学习一个整洁架构的开源项目,这是一名澳大利亚的软件架构师在github上面分享的项目:https://github.com/jasontaylordev/CleanArchitecture

作者的架构根底扎实,而且能灵活运用各种最新最简洁的技术知识,这个项目就用到非常多,我把代码pull下来之后发现直接编译过程中出了不少错误,花了两天时间都解决了。其中很大一部分是关于前端项目的内容,作者直接使用MSBuild来完成打包和创建,这只是我第一次看到。

另外还通过NSwag.MSBuild完成Open API代码的生成和typescript代码生成(运用于Angular),其中一个让我很惊讶的是:他居然在项目编译的时候初始化了数据库,弄得我云里雾里。我修改连接字符串,从报错信息才知道是执行这部分脚本的时候,MSWage的内核里初始化了Core的项目,调用到了初始化数据库代码:

Executing file 'config.nswag' with variables 'Configuration=Debug'...
C:\Users\csuma.nuget\packages\nswag.msbuild\14.0.7\tools\Net80

下面是报错信息:

Error NSwag command line tool for .NET Core Net80, toolchain v14.0.7.0 (NJsonSchema v11.0.0.0 (Newtonsoft.Json v13.0.0.0));Visit http://NSwag.org for more information.;NSwag bin directory: C:\Users\csuma.nuget\packages\nswag.msbuild\14.0.7\tools\Net80;Executing file 'config.nswag' with variables 'Configuration=Debug'...;Launcher directory: C:\Users\csuma.nuget\packages\nswag.msbuild\14.0.7\tools\Net80;fail: CleanArchitecture.Infrastructure.Data.ApplicationDbContextInitialiser[0];An error occurred while initialising the database.;Microsoft.EntityFrameworkCore.SqlServer.Storage.Internal.SqlServerDatabaseCreator.<>cDisplayClass20_0.<b0>d.MoveNext();--- End of stack trace from previous location ---;at Microsoft.EntityFrameworkCore.SqlServer.Storage.Internal.SqlServerDatabaseCreator.<>cDisplayClass20_0.<b0>d.MoveNext();--- End of stack trace from previous location ---;at Microsoft.EntityFrameworkCore.SqlServer.Storage.Internal.SqlServerExecutionStrategy.ExecuteAsync[TState,TResult](TState state, Func4 operation, Func4 verifySucceeded, CancellationToken cancellationToken);at Microsoft.EntityFrameworkCore.Migrations.HistoryRepository.ExistsAsync(CancellationToken cancellationToken);at Microsoft.EntityFrameworkCore.Migrations.Internal.Migrator.MigrateAsync(String targetMigration, CancellationToken cancellationToken);at CleanArchitecture.Infrastructure.Data.ApplicationDbContextInitialiser.InitialiseAsync() in D:\project\CleanArchitecture\CleanArchitecture-main\CleanArchitecture-main\src\Infrastructure\Data\ApplicationDbContextInitialiser.cs:line 46;at CleanArchitecture.Infrastructure.Data.InitialiserExtensions.InitialiseDatabaseAsync(WebApplication app) in D:\project\CleanArchitecture\CleanArchitecture-main\CleanArchitecture-main\src\Infrastructure\Data\ApplicationDbContextInitialiser.cs:line 21;at Program.

$(String[] args) in D:\project\CleanArchitecture\CleanArchitecture-main\CleanArchitecture-main\src\Web\Program.cs:line 17;at Program.
(String[] args);at System.RuntimeMethodHandle.InvokeMethod(Object target, Void** arguments, Signature sig, Boolean isConstructor);at System.Reflection.MethodBaseInvoker.InvokeDirectByRefWithFewArgs(Object obj, Span1 copyOfArgs, BindingFlags invokeAttr);ClientConnectionId:00000000-0000-0000-0000-000000000000;Error Number:-1,State:0,Class:20;--- End of inner exception stack trace ---;at System.Threading.Tasks.Task.ThrowIfExceptional(Boolean includeTaskCanceledExceptions);at Microsoft.EntityFrameworkCore.SqlServer.Storage.Internal.SqlServerDatabaseCreator.<>c__DisplayClass20_0.<<ExistsAsync>b__0>d.MoveNext();--- End of stack trace from previous location ---;at Microsoft.EntityFrameworkCore.SqlServer.Storage.Internal.SqlServerExecutionStrategy.ExecuteAsync[TState,TResult](TState state, Func4 operation, FuncMARKDOWN_HASH33b582cf368b2b1a5719cf334009e4afMARKDOWNHASH1 copyOfArgs, BindingFlags invokeAttr);--- End of inner exception stack trace ---;at System.Reflection.MethodBaseInvoker.InvokeDirectByRefWithFewArgs(Object obj, Span`1 copyOfArgs, BindingFlags invokeAttr);at System.Reflection.MethodBaseInvoker.InvokeWithFewArgs(Object obj, BindingFlags invokeAttr, Binder binder, Object[] parameters, CultureInfo culture);at System.Reflection.MethodBase.Invoke(Object obj, Object[] parameters);at NSwag.AspNetCore.Launcher.Program.Main(String[] args) in //src/NSwag.AspNetCore.Launcher/Program.cs:line 132;System.InvalidOperationException: Swagger generation failed with non-zero exit code '1'.;at NSwag.Commands.Generation.AspNetCore.AspNetCoreToOpenApiCommand.RunAsync(CommandLineProcessor processor, IConsoleHost host) in //src/NSwag.Commands/Commands/Generation/AspNetCore/AspNetCoreToOpenApiCommand.cs:line 195;at NSwag.Commands.NSwagDocumentBase.GenerateSwaggerDocumentAsync() in //src/NSwag.Commands/NSwagDocumentBase.cs:line 270;at NSwag.Commands.NSwagDocument.ExecuteAsync() in //src/NSwag.Commands/NSwagDocument.cs:line 67;at NSwag.Commands.Document.ExecuteDocumentCommand.ExecuteDocumentAsync(IConsoleHost host, String filePath) in //src/NSwag.Commands/Commands/Document/ExecuteDocumentCommand.cs:line 76;at NSwag.Commands.Document.ExecuteDocumentCommand.RunAsync(CommandLineProcessor processor, IConsoleHost host) in //src/NSwag.Commands/Commands/Document/ExecuteDocumentCommand.cs:line 33;at NConsole.CommandLineProcessor.ProcessSingleAsync(String[] args, Object input);at NConsole.CommandLineProcessor.ProcessAsync(String[] args, Object input);at NSwag.Commands.NSwagCommandProcessor.ProcessAsync(String[] args) in //src/NSwag.Commands/NSwagCommandProcessor.cs:line 65 Web D:\project\CleanArchitecture\CleanArchitecture-main\CleanArchitecture-main\src\Web\Web.csproj 71

04
6

命令行执行NSwag

0
归档:2024年6月分类:C#和.NET

Important for .NET Core: Assembly loading#net-core

To use the command line tool nswag.exe (.NET 4.6+) / dotnet-nswag.dll (.NET Core), choose one of the following methods:

NSwag NPM Module: Bindings for the .NET 4.6+ and .NET Core command line tools (depending on installed framework/OS platform)
Download latest NSwagStudio MSI installer or install package NSwagStudio via Chocolatey: After installing the application, the path to the nswag.exe binary is registered in the PATH variable so that the tool can be used in the Windows command line.
Download the latest command line tools: Extract the ZIP archive and use the nswag.exe binary in the Windows command line.
NSwag.MSBuild NuGet package
To see all available commands and parameters, run the command line application "nswag.exe" without parameters and enter "help" as command. All "input" parameters accept file paths, URLs and JSON data.

Commands:

run: Executes an nswag.json config file (recommended)
aspnetcore2openapi: AspNetCoreToOpenApiCommand
webapi2openapi: WebApiToOpenApiCommand (should not be used for ASP.NET Core projects)
types2openapi: TypesToOpenApiCommand
openapi2csclient: CSharpClientCommand
openapi2cscontroller: CSharpControllerCommand
openapi2tsclient: TypeScriptClientCommand
Execute .nswag configuration document
An .nswag configuration document contains the instructions to generate/read a Swagger specification and generate code from it. The configuration document can be created with the NSwagStudio or manually by editing its JSON contents. To create a new nswag.json document in the current directory, use the new command:

nswag new
You can execute an .nswag configuration document by using the run command:

nswag run MySwaggerConfig.nswag
To run all .nswag configuration documents (*.nswag and nswag.json) in the current directory use the run command without parameters:

nswag run
Keep in mind that code generators are only executed when the output path is set.

Document variables
You can use variables in the document and replace them via command line. Just define use a variable in the document:

{
"defaultVariables": "Configuration=Debug",
"swaggerGenerator": {
"webApiToSwagger": {
"assemblyPaths": [
"bin/$(Configuration)/netcoreapp2.0/Apiverse.Web.dll"
],
You can define multiple variables by seperate key value pairs with a comma.

nswag run /variables:Configuration=Release,SecondVariable=true
As you can see, you can define the default variables with the defaultVariables properties and use it with $(MyVariable).

You can now replace the parameter via command line

nswag run /variables:Configuration=Release
With the NSwag.MSBuild package you can pass, the current Configuration to the document:

Swagger Generators
For ASP.NET Core apps, see AspNetCoreToOpenApiCommand

Deprecated
The following commands should not be used with ASP.NET Core

To generate a Swagger/OpenAPI specification from a Web API controller in a .NET assembly, see WebApiOpenApiDocumentGenerator for more information:

nswag webapi2openapi /assembly:MyWebApiAssembly.dll
/controller:MyNamespace.MyController
/output:MyWebService.json
To generate a single Swagger/OpenAPI specification for all controllers in the assembly, just call the command without the controller parameter:

nswag webapi2openapi /assembly:MyWebApiAssembly.dll
/output:MyWebService.json
The assembly parameter accepts multiple assemblies separated with a comma, e.g. /assembly:a1.dll,a2.dll.

To populate the info (title, description, version), host, basepath, and schemes data in your output file, use the following command line parameters:

nswag webapi2openapi /assembly:MyWebApiAssembly.dll
/output:MyWebService.json
/InfoTitle:MyWebService
/InfoVersion:V1
/InfoDescription:"My web service"
/ServiceHost:my.host.net
/ServiceBasePath:"/api"
/ServiceSchemes:"http,https"
WebApiToOpenApiCommand.cs

Client Generators
Generate TypeScript client code from a Swagger specification, see TypeScriptClientGenerator for more information:

nswag openapi2tsclient /input:MyWebService.json
/output:MyModule.ts
TypeScriptClientCommand.cs

Generate C# client code from a Swagger specification, see CSharpClientGenerator:

nswag openapi2csclient /input:MyWebService.json
/classname:MyServiceClient
/namespace:MyNamespace
/output:MyServiceClient.cs
CSharpClientCommand.cs

Generate Swagger from .NET types
Generate a Swagger/OpenAPI specification describing only the given .NET types:

nswag types2swagger /assembly:MyAssembly.dll
/classnames:MyNamespace.Person,MyNamespace.Car
/output:MySwagger.json
TypesToOpenApiCommand.cs

JSON Schema converters
Generate C# classes from a JSON Schema:

nswag jsonschema2csclient /input:JsonSchema.json
/output:MyClasses.cs
JsonSchemaToCSharpCommand.cs

Generate TypeScript interfaces from a JSON Schema:

nswag jsonschema2tsclient /input:JsonSchema.json
/output:MyInterfaces.ts
JsonSchemaToTypeScriptCommand.cs

Appendix: How to use UseDocumentProvider
Run a customized build and select the assembly in NSwagStudio, create an nswag.json and execute it via CLI (nswag run nswag.json):

04
6

NSwag.MSBuild使用

0
归档:2024年6月分类:C#和.NET

Package: NSwag.MSBuild

Important for .NET Core: Assembly loading#net-core

After installing the NSwag.MSBuild NuGet package in your project, you can use the variable $(NSwagExe) in your .csproj file to run the NSwag command line tool in an MSBuild target. This way the tools can easily be updated via NuGet. The /controller parameter can be omitted to generate a Swagger specification for all controllers.


For better testability and stable output (defaults may change), it is recommended to create an NSwag Configuration Document (e.g. with NSwagStudio) and use:


Recommended for .NET Core/NET5 and later:


OnBuildSuccess


For more information about the missing DLLs in .NET Core, see Assembly loading#net-core.

More information on nswag run.

Runtime:

If you need to run the NSwag command line in x86 mode, use the $(NSwagExe_x86) placeholder. For .NET Core projects, one of the placeholders $(NSwagExe_Core##) or $(NSwagExe_Net##) (e.g. $(NSwagExe_Core31) for .NET Core 3.1) should be used instead of $(NSwagExe).

Available properties:

NSwagExe
NSwagExe_x86
NSwagExe_Core21
NSwagExe_Core31
NSwagExe_Net50
NSwagExe_Net60
NSwagExe_Net70
NSwagDir
NSwagDir_Core21
NSwagDir_Core31
NSwagDir_Net50
NSwagDir_Net60
NSwagDir_Net70
NSwag.MSBuild.props

See Command Line for more information.

Also see ServiceProjectReference for the new feature.

04
6

MSBuild介绍

0
归档:2024年6月分类:C#和.NET

Microsoft 生成引擎是一个用于生成应用程序的平台。 此引擎(也称为 MSBuild)为项目文件提供了一个 XML 架构,用于控制生成平台处理和生成软件的方式。 Visual Studio 会使用 MSBuild,但 MSBuild 不依赖于 Visual Studio。 通过在项目或解决方案文件中调用 msbuild.exe 或 dotnet build,可以在未安装 Visual Studio 的环境中安排和生成产品。

Visual Studio 使用 MSBuild 来加载和生成托管项目。 Visual Studio 中的项目文件(.csproj、.vbproj、vcxproj 等)包含 MSBuild XML 代码,当你使用 IDE 来生成项目时,此代码就会运行。 Visual Studio 项目会导入所有必要的设置和生成过程来执行典型的开发工作,但你可以从 Visual Studio 内或通过使用 XML 编辑器对其进行扩展或修改。

若要在没有 Visual Studio 的 Windows 系统上安装 MSBuild,请转到下载页面上的 Visual Studio 生成工具。 通过此方法安装 MSBuild 可获得 MSBuild.exe。

对于 .NET Core 和 .NET 5 或更高版本,获取 MSBuild 等效项的另一种方法是安装 .NET SDK。 .NET 生成命令 dotnet build 可与 macOS、Windows 或 Linux 上的 .NET SDK 一起使用。 .NET 生成命令 dotnet build 是 .NET Core 版本 MSBuild.exe 的精简包装器。 可以使用 .NET Core 命令行接口 (CLI)(使用 MSBuild)来生成面向 .NET Core 和 .NET 5 及更高版本的项目。

从 Visual Studio 2022 开始,当你在 Visual Studio 中生成时,将使用 64 位版本的 MSBuild。

有关适用于 C++ 的 MSBuild 的信息,请参阅 MSBuild (C++)。

下面的示例介绍了什么情况下可从命令行调用 MSBuild 而不是 Visual Studio IDE 来运行生成。

未安装 Visual Studio。

你需要使用 64 位版本的 MSBuild,你现在使用的是 Visual Studio 2019 或更早版本。 通常情况下不必使用此版本的 MSBuild,但它可以让 MSBuild 访问更多内存。

你想要在多个进程中运行同一生成。 不过,对于 C++ 和 C# 中的项目,你可以使用 IDE 实现相同的结果。

你想要修改生成系统。 例如,你可能想要实现以下操作:

在文件到达编译器之前先进行预处理。

将生成输出复制到其他位置。

从生成输出创建压缩文件。

执行后处理步骤。 例如,你可能希望使用其他版本来标记程序集。

你可以在 Visual Studio IDE 中编写代码,但使用 MSBuild 来运行生成。 或者,你也可以在开发计算机的 IDE 中生成代码,但从命令行运行 MSBuild,以在多个开发人员的协作下生成从源存储库集成的代码。

备注

你可以使用 Azure Pipelines 自动编译、测试和部署应用程序。 你的生成系统会在开发人员签入代码(例如,作为持续集成策略的一部分)时或按照计划(例如,夜间版本验证测试生成)自动运行生成。 Azure Pipelines 使用 MSBuild 来编译代码。 有关详细信息,请参阅 Azure Pipelines。

有关 Windows 上的 MSBuild 的介绍性教程,请参阅演练:使用 MSBuild。

在命令提示符处使用 MSBuild
若要在命令提示符处运行 MSBuild,请将项目文件随相应的命令行选项一起传递到 MSBuild.exe。 命令行选项允许你设置属性、执行特定的目标,以及设置可控制生成过程的其他选项。 例如,使用以下命令行语法生成文件 MyProj.proj,并将 Configuration 属性设置为 Debug。

Windows 命令提示符

复制
MSBuild.exe MyProj.proj -property:Configuration=Debug
MSBuild 不会根据文件扩展名更改其行为,但惯例是使用以proj结尾的扩展,如.csproj、.vcxproj或.vbproj,为名为“项目文件”的主 MSBuild 输入文件。

有关 MSBuild 命令行选项的详细信息,请参阅命令行参考。

重要

在下载项目之前,请确定代码的可信度。

对于 .NET Core 和 .NET 5 或更高版本,通常使用 dotnet build 调用 MSBuild。 请参阅 dotnet build。 如果仅安装 .NET SDK,而不安装 Visual Studio 或 Visual Studio 生成工具,则只能通过 dotnet build 安装 MSBuild。

命令行 dotnet build --help 列出了特定于 dotnet build 的命令行选项,而不是 MSBuild.exe 的所有选项,但你仍然可以使用 MSBuild 命令行参考中列出的所有命令行选项。 dotnet build 未处理的选项将传递给 MSBuild。

项目文件
MSBuild 使用简单且可扩展的基于 XML 的项目文件格式。 使用 MSBuild 项目文件格式,开发人员可以描述要生成的项,以及如何针对不同的操作系统和配置生成这些项。 另外,这种项目文件格式还允许开发人员创作可重用的生成规则,这些规则可以包含到不同的文件中,以便可以在产品内的不同项目之间一致地执行生成。

Visual Studio 生成系统将项目特定的逻辑存储在项目文件中,并使用导入的 MSBuild XML 文件(扩展名为 .props 和 .targets 等)来定义标准生成逻辑。 .props 文件定义 MSBuild 属性,而 .targets 文件定义 MSBuild 目标。 这些导入内容有时在 Visual Studio 项目文件中可见,但在 .NET Core、.NET 5 和 .NET 6 项目等较新的项目中,项目文件不显示导入内容;而是显示 SDK 引用,如下所示:

XML

复制


这些项目称为 SDK 风格的项目。 当你引用 SDK(如 .NET SDK)时,SDK 会隐式指定 .props 和 .target 文件的导入内容。

以下各节介绍了 MSBuild 项目文件格式的一些基本元素。 有关如何创建基本项目文件的教程,请参见演练:从头开始创建 MSBuild 项目文件。

属性
属性表示可用于配置生成的键/值对。 属性的声明方式是:创建一个与属性同名的元素,将其指定为 PropertyGroup 元素的子元素。 例如,下面的代码将创建一个名为 BuildDir 的属性,其值为 Build。

XML

复制

Build

通过在元素中放置一个 Condition 属性,你可以有条件地定义一个属性。 除非条件的计算结果为 true,否则会忽略条件元素的内容。 在下面的示例中,将定义 Configuration 属性(如果尚未定义)。

XML

复制
DefaultValue
在整个项目文件中,可以使用语法 $ () 来引用各个属性。 例如,可以使用 $(BuildDir) 和 $(Configuration) 来引用前面示例中的属性。

有关属性的详细信息,请参阅 MSBuild 属性。

项目
项是生成系统的输入,通常表示文件。 将根据用户定义的项名称,将项编组到各种项类型中。 这些项类型可以用作任务的参数,任务使用各个项来执行生成过程的步骤。

项目文件中项的声明方法是:通过创建一个与项类型同名的元素,并将其指定为 ItemGroup 元素的子元素。 例如,下面的代码将创建一个名为 Compile 的项类型,其中包括两个文件。

XML

复制


在整个项目文件中,可以使用语法 @() 来引用项类型。 例如,可以使用 @(Compile) 引用示例中的项类型。

在 MSBuild 中,元素和特性名称区分大小写。 但是,属性、项和元数据名称不区分大小写。 下面的示例创建了项类型 Compile、comPile 或任何其他大小写变体,并为其指定了值“one.cs;two.cs”。

XML

复制


可以使用通配符声明项,并且对于更高级的生成方案,项可以包含其他元数据。 有关项的详细信息,请参阅项。

任务
任务是 MSBuild 项目用于执行生成操作的可执行代码单元。 例如,任务可能编译输入文件或运行外部工具。 任务可以重用,并且可由不同项目中的不同开发人员共享。

任务的执行逻辑在托管代码中编写,并使用 UsingTask 元素映射到 MSBuild。 你可以通过创作一个实现 ITask 接口的托管类型来编写自己的任务。 有关如何编写任务的详细信息,请参阅任务写入。

MSBuild 包含一些可按需进行修改的常见任务。 例如,用于复制文件的复制、用于创建目录的 MakeDir 以及用于编译 Visual C# 源代码文件的 Csc。 有关可用任务的列表以及用法信息,请参阅任务参考。

通过创建一个与任务同名的元素,并将其指定为 Target 元素的子元素,可以在 MSBuild 项目文件中执行此任务。 任务通常接受参数,参数将作为元素的特性进行传递。 MSBuild 的属性和项都可用作参数。 例如,以下代码将调用 MakeDir 任务,并将前面示例中声明的 BuildDir 属性的值传递到该任务。

XML

复制


有关任务的详细信息,请参阅任务。

目标
目标按特定的顺序将任务组合到一起,并将项目文件的各个部分公开为生成过程的入口点。 目标通常分组到各个逻辑部分中,以便提高可读性并实现扩展。 通过将生成步骤拆分为目标,你可以从其他目标中调用生成过程的一个部分,而不必将那部分代码复制到每个目标中。 例如,如果生成过程的多个入口点需要生成引用,你可以创建一个生成引用的目标,然后从所要求的每个入口点运行此目标。

目标是使用 Target 元素在项目文件中声明的。 例如,以下代码将创建一个名为 Compile 的目标,该目标随后将调用具有前面示例中声明的项列表的 Csc 任务。

XML

复制


在更高级的方案中,目标可用于描述彼此之间的关系并执行依赖性分析,这样,如果目标是最新的,则可以跳过生成过程的整个部分。 有关目标的更多信息,请参阅目标。

生成日志
你可以将生成错误、警告和消息记录到控制台或其他输出设备。 有关详细信息,请参阅使用 MSBuild 获取生成日志。

在 Visual Studio 中使用 MSBuild
Visual Studio 使用 MSBuild 项目文件格式存储有关托管项目的生成信息。 通过使用 Visual Studio 接口添加或更改的项目设置将反映在为每个项目生成的 .*proj 文件中。 Visual Studio 使用 MSBuild 的一个托管实例来生成托管项目。 这意味着可以在 Visual Studio 中或在命令提示符处生成托管项目(即使未安装 Visual Studio),并且结果将完全相同。

有关如何在 Visual Studio 中使用 MSBuild 的教程,请参阅演练:使用 MSBuild。

多目标
通过使用 Visual Studio,可以编译应用程序,使其能够在多个版本的 .NET Framework 或 .NET Core(包括 .NET 5 和更高版本)上运行。 例如,可以将同一个应用程序编译为既能在 32 位平台的 .NET Framework 4 上运行,也能在 64 位平台的 .NET Framework 4.8 上运行。 这种使用多个框架作为编译目标的能力称为“多目标功能”。

以下是多目标功能的一些优点:

可以开发以多个 .NET Framework 早期版本(例如,版本 3.5 和 4.7.2)为目标的应用程序。

可以一个框架配置文件为目标,该文件是目标框架的预定义子集。

如果已发布 .NET Framework 当前版本的服务包,则可以将其作为目标。

多目标功能可以保证应用程序仅使用目标框架和平台中的可用功能。

有关详细信息,请参阅多定向。

自定义生成
MSBuild 为多种自定义生成方案提供了支持。 大多数内置功能都可以重写或扩展。 请参阅自定义生成。

以编程方式访问 MSBuild
如果要开发生成工具,可能需要以编程方式从 .NET 应用程序调用 MSBuild。 通过使用 MSBuild API,可以控制复杂生成系统的所有方面。 MSBuild 提供了具有完整 API(Microsoft.Build 命名空间)的 NuGet 包,你可从 .NET 应用程序将其用于这些目的。 请参阅使用 MSBuild API。

MSBuild 是开源的
MSBuild 是一种接受用户贡献的开源项目,就像 .NET 生态系统的其余部分一样。 GitHub 中提供了包含 MSBuild 源的存储库:MSBuild GitHub 存储库。

04
6

NSwag 和 ASP.NET Core 入门

0
归档:2024年6月分类:C#和.NET

NSwag 提供了下列功能:

能够使用 Swagger UI 和 Swagger 生成器。
灵活的代码生成功能。
借助 NSwag,无需使用现有 API。也就是说,可使用包含 Swagger 的第三方 API,并生成客户端实现。 使用 NSwag,可以加快开发周期,并轻松适应 API 更改。

包安装
将 NSwag 安装到:

生成已实现的 Web API 的 Swagger 规范。
为 Swagger UI 提供服务以浏览和测试 Web API。
为 Redoc 提供服务,以为 Web API 添加 API 文档。
若要使用 NSwag ASP.NET Core 中间件,请安装 NSwag.AspNetCore NuGet 包。 此包内的中间件可用于生成并提供Swagger 规范、Swagger UI(v2 和 v3)和 ReDoc UI。 NSwag 14 仅支持 v3 版的 Swagger UI 规范。

若要安装 NSwag NuGet 包,请使用以下方法之一:

Visual Studio
Visual Studio for Mac
Visual Studio Code
.NET CLI
从“程序包管理器控制台”窗口:

转到“视图”>“其他窗口”>“程序包管理器控制台”

导航到包含 NSwagSample.csproj 文件的目录

请执行以下命令:

PowerShell

复制
Install-Package NSwag.AspNetCore
从“管理 NuGet 程序包”对话框中:

右键单击“解决方案资源管理器”>“管理 NuGet 包”中的项目
将“包源”设置为“nuget.org”
在搜索框中输入“NSwag.AspNetCore”
从“浏览”选项卡中选择“NSwag.AspNetCore”包,然后单击“安装”
添加并配置 Swagger 中间件
通过执行以下步骤,在 ASP.NET Core 应用中添加和配置 Swagger:

将 OpenApi 生成器添加到 Program.cs 中的服务集合:
C#

复制
var builder = WebApplication.CreateBuilder(args);

builder.Services.AddControllers();
builder.Services.AddOpenApiDocument();
启用中间件来提供生成的 OpenApi 规范、Swagger UI 和 Redoc UI,同时在 Program.cs 中:
C#

复制
if (app.Environment.IsDevelopment())
{
// Add OpenAPI 3.0 document serving middleware
// Available at: http://localhost:/swagger/v1/swagger.json
app.UseOpenApi();

// Add web UIs to interact with the document
// Available at: http://localhost:/swagger
app.UseSwaggerUi(); // UseSwaggerUI Protected by if (env.IsDevelopment())

}
启动应用。 转到:
http://localhost:/swagger,以查看 Swagger UI。
http://localhost:/swagger/v1/swagger.json,以查看 Swagger 规范。
代码生成
若要利用 NSwag 的代码生成功能,可选择以下选项之一:

NSwagStudio:一款 Windows 桌面应用,用于在 C# 或 TypeScript 中生成 API 客户端代码。
NSwag.CodeGeneration.CSharp 或 NSwag.CodeGeneration.TypeScript NuGet 包 - 用于在项目中生成代码。
通过命令行使用 NSwag。
NSwag.MSBuild NuGet 包。
Unchase OpenAPI (Swagger) Connected Service(Unchase OpenAPI (Swagger) 连接服务):一种 Visual Studio 连接服务,用于在 C# 或 TypeScript 中生成 API 客户端代码。 还可以使用 NSwag 为 OpenAPI 服务生成 C# 控制器。
使用 NSwagStudio 生成代码
按照 NSwagStudio GitHub 存储库中的说明操作,以安装 NSwagStudio。 在 NSwag 发布页面上,可以下载无需安装和管理员权限即可启动的 xcopy 版本。
启动 NSwagStudio,并在“Swagger 规范 URL”文本框中输入 swagger.json 文件 URL。 例如 http://localhost:5232/swagger/v1/swagger.json
单击“创建本地副本”按钮,以生成 Swagger 规范的 JSON 表示形式。
NSwag Studio 导入规范并导出 CSharp 客户端。

在“输出”区域中,单击“CSharp 客户端”复选框。 也可以选中“TypeScript 客户端”或“C# Web API 控制器”,具体视项目而定。 如果选中“C# Web API 控制器”,服务规范会重新生成服务,起到反向生成的作用。
单击“生成输出”,以生成 TodoApi.NSwag 项目的完整 C# 客户端实现。 若要查看生成的客户端代码,请单击“C# 客户端”选项卡:
C#

复制
namespace MyNamespace
{
using System = global::System;

[System.CodeDom.Compiler.GeneratedCode("NSwag", "14.0.1.0 (NJsonSchema v11.0.0.0 (Newtonsoft.Json v13.0.0.0))")]
public partial class TodoClient
{
#pragma warning disable 8618 // Set by constructor via BaseUrl property
    private string _baseUrl;
#pragma warning restore 8618 // Set by constructor via BaseUrl property
    private System.Net.Http.HttpClient _httpClient;
    private static System.Lazy _settings = new System.Lazy(CreateSerializerSettings, true);

    public TodoClient(System.Net.Http.HttpClient httpClient)
    {
        BaseUrl = "http://localhost:5232";
        _httpClient = httpClient;
    }

    private static Newtonsoft.Json.JsonSerializerSettings CreateSerializerSettings()
    {
        var settings = new Newtonsoft.Json.JsonSerializerSettings();
        UpdateJsonSerializerSettings(settings);
        return settings;
    }

    public string BaseUrl
    {
        get { return _baseUrl; }
        set
        {
            _baseUrl = value;
            if (!string.IsNullOrEmpty(_baseUrl) && !_baseUrl.EndsWith("/"))
                _baseUrl += '/';
        }
    }
    // code omitted for brevity

提示

C# 客户端代码的生成依据是,“设置”选项卡中的选择。修改设置以执行任务,例如默认命名空间重命名和同步方法生成。

将生成的 C# 代码复制到使用 API 的客户端项目内的文件中。
开始使用 Web API:
C#

复制
var todoClient = new TodoClient(new HttpClient());

// Gets all to-dos from the API
var allTodos = await todoClient.GetAsync();

// Create a new TodoItem, and save it via the API.
await todoClient.CreateAsync(new TodoItem());

// Get a single to-do by ID
var foundTodo = await todoClient.GetByIdAsync(1);

公告栏

欢迎大家来到我的博客,我是dodoro,希望我的博客能给你带来帮助。